DIY Modern Minimal Concrete Planter Boxes
In that location's something about simple, straightforward concrete planter boxes that appeals to many people regardless of their way preferences. Even so, the toll tag of a solid-class concrete planter can be a deterrent. If you can relate to this dilemma, you'll be happy to learn that this simple DIY thought is not only fast, but information technology's quite cost-effective and easy. That'due south a win-win-win. Let'south get started, so you're ready for the planting flavor.
 View in gallery
  View in gallery
 DIY Level: Beginner
 View in gallery
 Materials Needed:
- Four (iv) equal-sized, directly-edged concrete pavers (example shows 12" squares)
- Landscape adhesive
- Ardex feather finish (not shown)
- Concrete sealer
- Potting soil & plants
 View in gallery
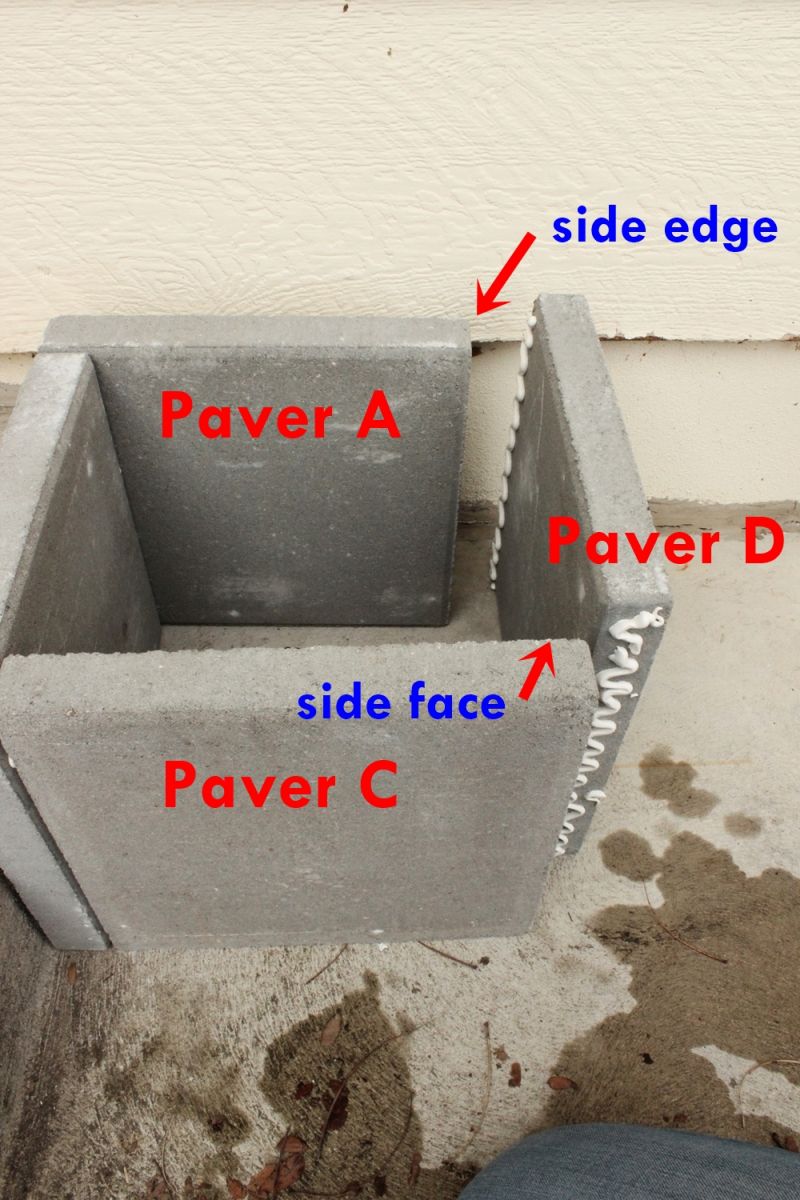
 Begin your projection on a clean, flat surface outside. I recommend some physical steps if possible, as the ascension of the nearest stride volition provide some 90-degree bending support while the adhesive on your planter box dries. Set your first concrete paver (Paver A) on its side, propped side by side to the step for support.
 View in gallery
 Apply landscape agglutinative to the side edge of your 2nd concrete paver (Paver B). A zig-zag awarding is helpful to solidify the adherence and the method I recommend.
 View in gallery
 Bring the glued border of Paver B close to the side face of Paver A. Straighten their alignment to as close to a xc-caste angle every bit possible.
 View in gallery
 Adhere the edge and face up together, pushing them tightly into each other.
 View in gallery
 Try to keep a 90-degree bending here, but don't stress about it yet. You'll finalize the angles a piddling later. This is 1 reason, withal, why information technology's helpful to utilize any nearby vertical faces – it'll help the planter stay upright solidly without having to worry virtually its falling over while the adhesive is nevertheless fresh.
 View in gallery
 Employ landscape adhesive to the side edge of your third concrete paver (Paver C), and push button it firmly into the side face up of Paver B. Once more, exercise your best to maintain 90-caste corners, but don't be also precise quite yet. Annotation: If you desire to cease up with a truthful foursquare planter box, it'south of import to pay attending to the zipper of the side edges to the side faces, and so all sides finish up equal.
 View in gallery
 Grab your fourth physical paver (Paver D) and employ mural adhesive to one side edge and also to the opposing side face. Keep the zig-zag of adhesive on the side face up almost the same size/width every bit the agglutinative you put on the side edge – this shouldn't be difficult, equally you'll likely have a feel for it past now.
 View in gallery
 Line up Paver D and then that (1) the glued side edge will press into the side face of Paver C, and (2) the glued side face up will press into the side border of Paver A.
 View in gallery
 When all sides are pressed firmly together, foursquare off each corner to a perfect 90 degrees. When the planter box is squared off and secure, exit information technology lone for at to the lowest degree 24 hours, or until the landscape adhesive cures and dries completely.
 View in gallery
 Optional: carefully transfer the physical planter boxes to a gravel workspace so the Ardex plume finish won't mar whatever existing concrete surfaces.
 View in gallery
 Mix up the feather cease as per package instructions.
 View in gallery
  View in gallery
 For each concrete planter box, I used a mixture of about 3 cups of pulverisation…
 View in gallery
 …with well-nigh 2 cups of water.
 View in gallery
 Stir it up.
 View in gallery
 This is slightly more water than the instructions call for; play effectually with your ratios to become a adept peanut butter-similar consistency.
 View in gallery
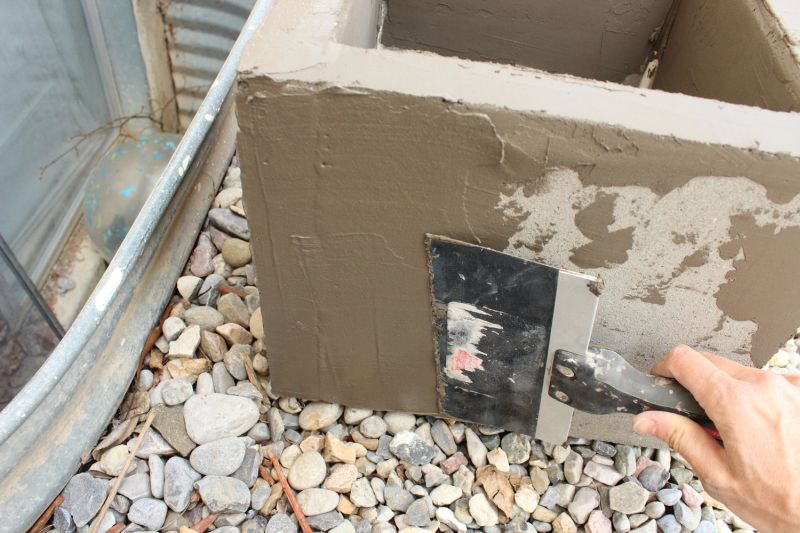
 You're going to employ the plume stop freely to the outside faces, tops, and upper half or tertiary of the interior faces of your concrete planter box.
 View in gallery
 Start by slathering some feather finish to the inside corners. Your goal here is to encompass the seam and the adhesive.
 View in gallery
  View in gallery
 Load your spreader with plumage finish.
 View in gallery
 Apply to the within wall'southward top half (or top third).
 View in gallery
  View in gallery
 Repeat for other within corners and walls, then move onto the four peak edges of the planter.
 View in gallery
 On the outside walls, first make full the adhesive crack.
 View in gallery
 To do this, work your loaded spreader horizontally over the crack, from top to lesser.
 View in gallery
 Work out excess toward the center of the wall.
 View in gallery
 When the surfaces near the adhesive crevice are covered, piece of work your spreader vertically to brand the agglutinative crack smooth. If y'all get horizontally over this, your spreader will always dip slightly into the crack. Your last passes should be vertical to make the scissure disappear.
 View in gallery
 Continue to piece of work feather finish around the exterior wall, adding more to your spreader as needed.
 View in gallery
 Add additional plumage finish to the corners; you lot can ever sand these down a little later. It'due south better to have more, with a solid roofing on the corners, than less.
 View in gallery
 Shine the entire wall to your taste. Some people prefer a really raw concrete stop (very industrial), while others prefer more subtle ones.
 View in gallery
 Run your spreader in multiple directions to decrease bubbling and increase interesting spreader lines. (If you like that kind of thing…which I practice.)
 View in gallery
 Loosely check your corners and edges from multiple angles here; if you desire to smooth them out a chip, become ahead. Keep in mind, though, that also much messing around with the feather stop tin make things expect worse. Yous'll be able to sand away rough corners and edges after it dries, too.
 View in gallery
  View in gallery
 You can even smooth out corners with your finger, if y'all find that helpful.
 View in gallery
 Of course, it'south up to you and your preference, only I would recommend that you don't exist too conscientious near smoothness here.
 View in gallery
 Leaving in some of the trowel lines volition give the concrete planter a fiddling more character and that industrial aesthetic we tend to honey.
 View in gallery
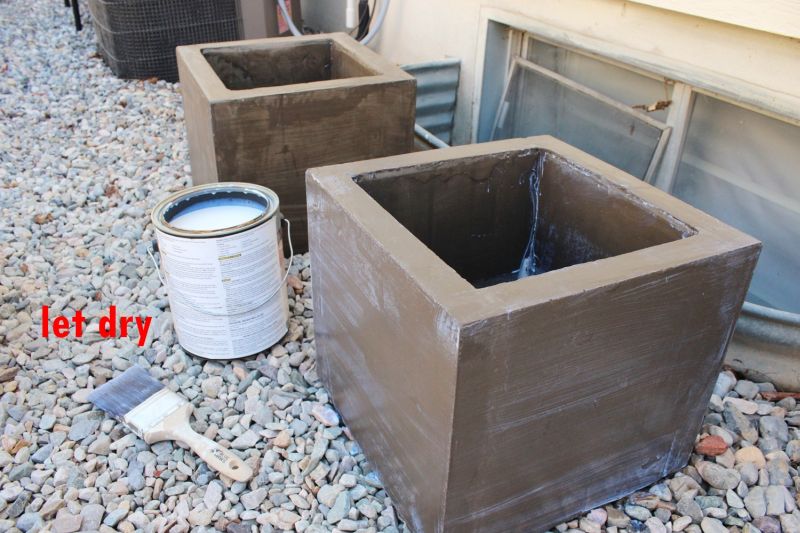
 Let the feather end dry thoroughly. Touch up every bit needed.
 View in gallery
 Sand with fibroid to medium grit sandpaper if you desire; this isn't necessary, though.
 View in gallery
 It simply depends on your preferences for raw industrialism aesthetics – the rougher your concrete planter box is, the more industrial information technology will likely look.
 View in gallery
 Choose a concrete sealant that is designed for outside use.
 View in gallery
 The sealant will probably accept a bluish-white tinge to information technology, resembling skim milk or similar. Although mayhap disconcerting, don't worry about this; when it dries, the sealant will exist completely clear and glossy.
 View in gallery
 Sealing is rather easy; however, this stuff tends to dry fairly quickly, so your application fourth dimension might be limited. I recommend a system that will allow you lot to seal the unabridged planter box strategically and eliminate, or at least minimize, unnecessary drips of sealant. Start with a generous swipe across the top surface of 1 side. Ignore the dripping downward the sides for a infinitesimal.
 View in gallery
 Seal the inside of the planter box on that side, beginning with the two affected corners and so covering the inside wall between them.
 View in gallery
 Then move to the outside wall on that same side of your planter box, and seal the entire thing. Look briefly on both adjoining sides for noticeable drips and wipe them away before moving onto the side by side side.
 View in gallery
 Repeat this method for all four sides; then do a final one time-over for any lingering drips of sealant.
 View in gallery
 Permit the whole matter dry thoroughly. And then flip it over and seal the lesser edge – not for the concrete paver itself, only more for the very edge of feather stop on the bottom edge that may non accept been finer sealed yet. This will help to prevent moisture'south creeping up through the plume terminate from the ground when it rains or whatever.
 View in gallery
 Place the concrete planter boxes where you want them.
 View in gallery
 In this instance, two concrete planter boxes flank the ramp upwards to a backyard shed.Loving the mode that they expect, yet, we are planning on making four more to spread around the backyard landscape.
 View in gallery
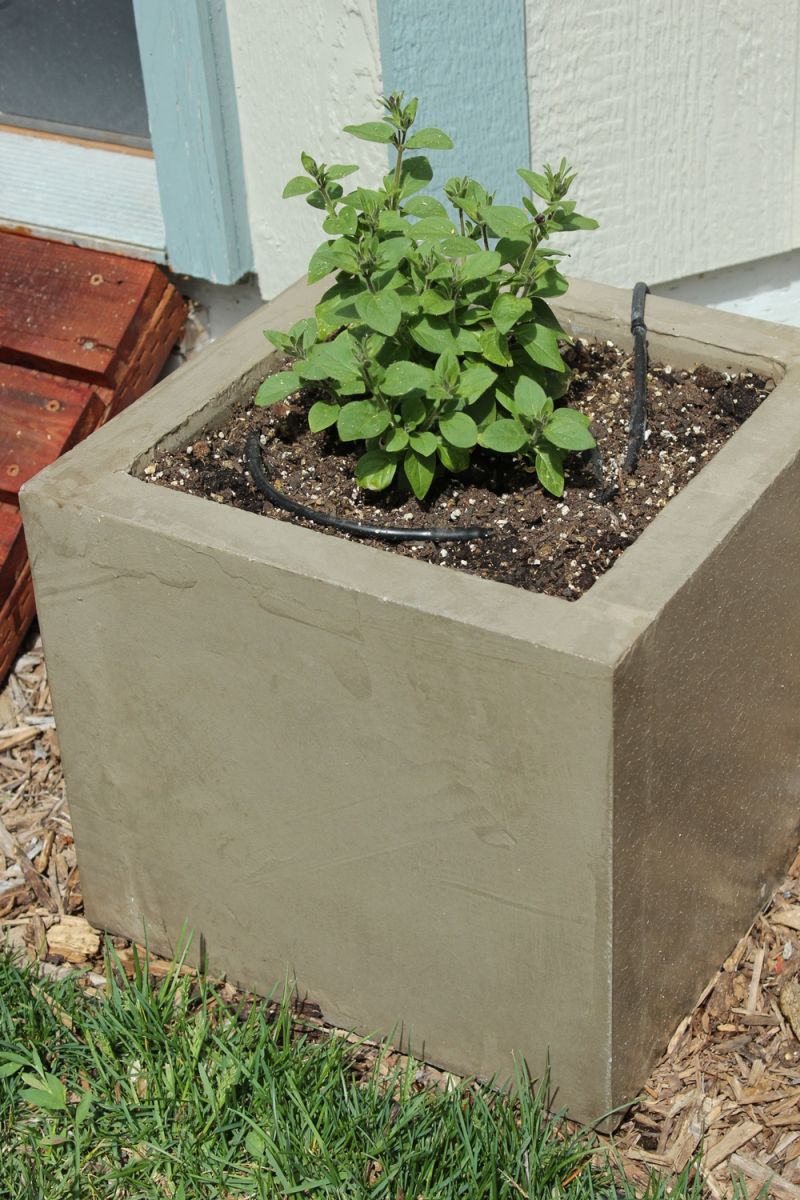
 Make full with potting soil and add your plants, whatever they may be. Case shows a unmarried tidal wave petunia in each concrete planter box, which will fill the acme space beautifully in simply a few weeks.
 View in gallery
 Be certain to add together a water source, such as a sprinkler or drip organization, or take care that yous water your plants every solar day. Whatever growing affair planted higher up ground will dry faster than plants in the ground itself, due to increased wind and heat effects on the pot itself and, consequently, the soil.
 View in gallery
 It'southward such a cool, crisply industrial look for such niggling cost and effort.
 View in gallery
 We dearest the dissimilarity of a bright flowering plant with the grayness physical of the simple planter box. Beautiful.
 View in gallery
 And, if you're making i, I highly recommend making at least two at the same time. Because you'll want more of them. Trust me.
stampleyweref2001.blogspot.com
Source: https://www.homedit.com/concrete-planter-boxes/
0 Response to "DIY Modern Minimal Concrete Planter Boxes"
Post a Comment